

How to make Mosaic Jewelry with Apoxie Sculpt
How to make your own beautiful Mosaic Jewelry with Apoxie Sculpt
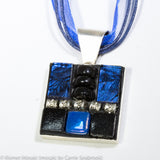
The process to create your own Mosaic jewelry with Apoxie Sculpt is much easier than you think. It is appropriate for most ages, except young children. There is very little mess, as no grout is needed in this process. It also takes very little time to make your piece after you have the materials. Below are documented steps on how to make a mosaic piece of jewelry. This was my very first piece!
Kismet Mosaic has all the supplies necessary to create your own personalized jewelry in any imaginable color, with beads, Kismet glass or even Van Gogh and Mirror Stained Glass!!!
Note: At that bottom of these instructions is a link to a collection that contains all products necessary to purchase for this project.
Let your creativity flow.....
Step 1 – Decide what you want to make: a pendant necklace, a ring, a pendant bracelet or earrings?
*All available at http://www.kismetmosaic.com/collections/jewelry
         
|
Step 2 – What is your color scheme? The possibilities are endless. Maybe you like black and white or blue and green? Look through all the 8mm Kismet Glass, beads and Stained glass (Van Gogh or Mirror Glass) to assist your search. Not much is needed for the bezel jewelry!! Possibly an assorted mix of glass!!??
Step 3 – Once you come up with the color scheme for the glass and adornments, you need to decide on an Apoxie Sculpt color. Take a look at all the Apoxie Sculpt at Kismet Mosaic. The color kits would work as they have small portions that are plenty for several pieces of jewelry.
*See http://www.kismetmosaic.com/collections/apoxie-sculpt and
http://www.kismetmosaic.com/collections/apoxie-sculpt-color-kit
Step 4 – Make your purchases of jewelry, Apoxie Sculpt, tools (if necessary), glass and adornments at www.kismetmosaic.com.
Note: You might also want to purchase the Safety Solvent for Apoxie Sculpt clean up.
http://www.kismetmosaic.com/collections/apoxie-solvent
I would also recommend tools to help with the Apoxie Sculpt and placement of pieces, especially the spatula set or dental picks.
http://www.kismetmosaic.com/collections/accessories
Step 5 – Setup your work area
- Use some white poster board or brown paper in a work area with plenty of light and safe from small children and animals. I used a large poster board to hold all my material.
- Jewelry blank, Apoxie Sculpt, glass, beads or any adornments you will have on your finished piece.
- Wheeled nippers are only necessary if you have to cut your glass smaller. See http://www.kismetmosaic.com/collections/cutting-tools/products/leponitt-wheeled-nipper
- Pencil
- Paper towels for quick clean ups.

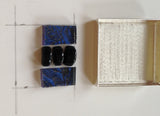
Step 6 – Layout pieces on poster board and plan your design on paper.
- Using the pencil, draw the outline of the jewelry piece you plan to make. (Draw the inside outline dimensions.) This will be used to do a dry run and lay out the pieces onto the poster board before opening Apoxie Sculpt.
- After the outline is drawn, lay your pieces into the outline on the poster board. This allows you to re-arrange over and over until you get exactly what you want!
- Use the wheeled nippers to cut glass if necessary. In my example you can see that I cut a few Kismet Mini-rounds in half (very easy). I then had several semi-circles to place in my piece.


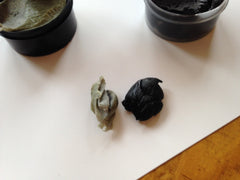
Step 7 – Mix Apoxie Sculpt.
- Open parts A & B of Apoxie Sculpt color you have chosen.
- Using one of the small metal spatulas you have purchased, take out a small, equal portion of both parts. In the piece pictured above (about 1.5” square and 4mm deep), I took out about ¼ teaspoon of each of parts A & B.
- Mix both parts between your fingers, rolling, squeezing and kneading over and over again until colors completely mixed. Should take about 2 minutes. (You can use latex gloves if want, but it is not necessary). Clean up your hands with Safety Solvent or soap and water after finished mixing. Your hands will be sticky and you don’t want to get this all over the pieces.

Step 8 – Place mixed Apoxie Sculpt into jewelry bezel.
- Take your Apoxie mixture and press it into the bezel as evenly a possible. Make sure all areas are covered.
- Using one of the metal spatulas, scrape any excess Apoxie off the top. The Apoxie should be slightly lower than the top of the bezel. Remember you need room to push the pieces of glass and other items into the Apoxie, which will displace some.
- Apoxie Sculpt has several hours of working time. If you have too much oozing out after your glass and pieces are complete, then you can use the tools to clear away excess.

Step 9 – Time to add the glass and other pieces!
- Taking one piece at time from your dry run, place a piece into position onto the Apoxie. Press lightly. It is a personal choice how much you want your glass and other pieces to stick up above the top of the bezel. The more your press, the deeper the piece goes. Just remember you also displace more Apoxie that may or may not need to be removed.
- Continue this process until all pieces are completed.
- Use whatever tools you choose to clear away excess Apoxie.

Step 10 – All done!!! {Wasn’t that easy and fun?}
- Clean up your work area.
- Clean up sides and back of your bezel if it got messy from handling Apoxie.
- Set aside the mosaic jewelry you just made. It takes about 24 hours to totally cure and for the Apoxie to harden. Keep it in a safe area to dry.
How to purchase the items for this project?
See this Make my Own Mosaic Jewelry collection for all option.